Gmail Webhooks
How it works
- After setting up the webhook on GCP, we get notified every time an email in reports@wisk.ai is received. We get notified in wisk-api
public/gmail/webhookendpoint. - This endpoint will then get the
history_id(that basically references an email) and call two different queue jobs:fetchSalesFromGmailHistorywill connect to gmail to read the labels applied to this email. Based on those labels, we’ll try to find a venue using that label and if found, call theimport_salesjob to import sales from that email.fetchInvoicesFromGmailHistorywill connect to gmail to read the address to which the email was sent. That address is in the formatinbox+{venue_slug}@wisk.ai. Based on that we’ll try to find a venue using that slug and if found, call theimport_inbox_invoicesjob to import invoices from that email.
NOTE On dev and stage, the inbox address will be inboxdev+{venue_slug}@wisk.ai and inboxstage+{venue_slug}@wisk.ai
Setting up webhooks on GCP
- Gmail Webhooks are used to get notified when an email arrives to a specific account.
- Webhooks are managed through Google Pub/Sub.
- Following this we create a Topic and an associated Subscription.
- Then from here we click on our new topic and go to
View Permissionsand addgmail-api-push@system.gserviceaccount.comas Pub/Sub publisher. - In the Credentials section in GCP create a new OAuth 2.0 Client ID for a web application. The redirect URI needs to be set (needed in the next step to fetch the code) and the Client ID and Client secret should be written down somewhere.
- Using Postman we create an url similar to this one: https://accounts.google.com/o/oauth2/v2/auth?access_type=offline&client_id=172615538030-q127d3qg4btdmc8jihu6hgp4fr80e02t.apps.googleusercontent.com&response_type=code&scope=https://www.googleapis.com/auth/gmail.modify&redirect_uri=https://web.wisk.cool

- The url should be copied and opened it in a browser. To authorise the report@wisk.ai gmail account should be used. Once this is done, the browser will redirect to the redirect URI and after the page loads, the
codefrom the url query parameters should be copied. - After that, a POST request in postman with an url like this (with grant_type, client_id, redirect_uri, code) should be executed: https://oauth2.googleapis.com/token?grant_type=authorization_code&client_id=75161128058-4jcc9bqme1l9i8kridltit1vdqrsamrj.apps.googleusercontent.com&client_secret=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&redirect_uri=https://web.wisk.cool&code=4/0AfJohXnHtVTAf8IC2xP3h4zS7Tc9h4HF0YddXhjNR7B-duO0GqsOn2YTpeBip1EXj1mcCQ
- Using the
access_tokenandrefresh_tokenfrom the response we need to make a call on Postman to get anaccess_tokenfor the proper account: https://oauth2.googleapis.com/token?grant_type=refresh_token&client_id=661464495930-pt1fasqdluo6go138a3hjpg08vb9vtpd.apps.googleusercontent.com&client_secret=7bN2NsY4SxWKdfSG3sBb1845&access_token=ya29.GlvmBshL5Sca5iakJKOs6V8vwt51nDXrRwol1LEGOz-jFW7QToCMCQtD3zCzMOVP_KgzqlE6VS-GxP-SE7ioZY83KttJRG3HaAiEREnD0W6HuGThAalENqAmUour&refresh_token=1/YMZuLDjm_OQnq0ohBJ79R_EX_AcySt5no2qY1GOSqWM

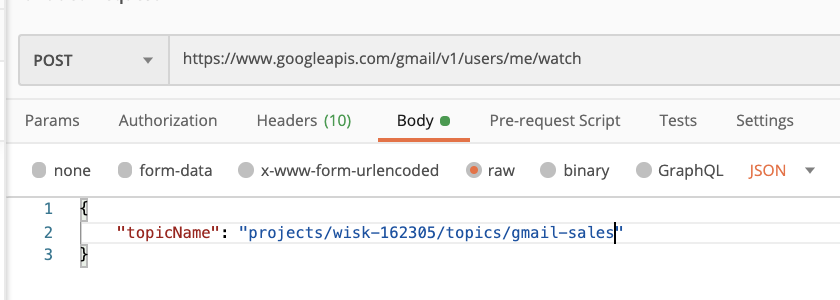
- And then using that token as an
Authorizationheader (addingBearerbefore the token), we make this call:

- This
watchcall expires every 7 days. Google recommends to call this api daily to be sure we’ll always get the notifications. In our case, we have a daily scheduler calling wisk-api/sales/gmail-add-webhookendpoint that takes care of this. - If the Gmail API wasn’t already allowed on the project, there will be an error in the response with an url similar to this: https://console.developers.google.com/apis/api/gmail.googleapis.com/overview?project=75161128058
- After opening the url in the browser and enabling Gmail API, retry the request and if everything went well a historyId should be returned in the response.